The Only Three Numbers I Care About
When I’m choosing the parts for my build, I use the Toggle Stats button to open the detailed numbers. On the usual controller layout this is the Y button, but use whatever button the game shows for Toggle Stats.
These three numbers are what I use to judge the parts build:
1. HORSEPOWER-TO-WEIGHT RATIO
Think of it as Top Speed to Handling ratio.
For handling builds, lowering weight will improve cornering and braking. This is what I prioritize in most of my builds. For top speed builds, power matters most.
2. LATERAL Gs
This is the grip number.
Tire compound, tire width, vehicle weight, and downforce are the main things changing it. If you want your car to stick to the road, this matters.
3. BRAKING DISTANCE
How quickly can you stop?
Brakes matter, but so do tire grip, tire width, vehicle weight, and downforce. A lighter car on better tires can stop much better without the most expensive brake package.
My Build Order
I pick the car and target class, then work through the actual upgrade menus in this order.
I can swap engines and parts as many times as I want without paying. I do not check out until the entire combination makes sense.
CONVERSIONS
These make the biggest impact to performance and PI ratings.
- Engine Swaps
- Aspiration Conversion
- Drivetrain Conversion
- Widebody Kits
AERO AND APPEARANCE
Improves grip. Lowers top speed.
- Front Spoiler
- Rear Spoiler
TIRES AND RIMS
Grip matters more in Forza Horizon 6 than it did in previous games.
- Tire Compound – The most important decision of the build.
- Rear Tire Width - Always max for AWD builds
- Front Tire Width
DRIVETRAIN
Customizability of gear ratios and power delivery to the wheels.
- Transmission – Race, 7 Speed or above are usually worth it.
- Differential – Always pick one.
PLATFORM AND HANDLING
If you want to go around corners fast, this is how you do it.
- Weight Reduction
- Front & Rear Anti-Roll Bars – Always Use
- Suspension – Always Use
- Chassis Stiffening – Only for higher classes, older vehicles
- Brakes
ENGINE
More power. Enough said.
- Exhaust
- Centrifugal Supercharger / Turbo / Supercharger
- Camshaft (best for top speed builds)
- Other Upgrades (Air Intake, Fuel System, Ignition, Valves, Engine Blocks, etc.) will be reviewed individually for HP to Weight + PI cost.
FINISHING TOUCHES
Increase or decrease PI by small amounts to hit your target class.
- Front Tire Width
- Drivetrain: Driveline
- Tires & Rims: Wheel Type (Lighter)
- Aero and Appearance: Hoods, Front/Rear Fenders, Side Skirts (Lighter)
- Engine: Flywheel, Oil Cooling
- Tires & Rims: Front Wheel Size (Increase)
- Drivetrain: Clutch (Frequently not worth it)
- Tires & Rims: Wheel Size (Increase)
- Tires & Rims: Wheel Type (Heavier)
- Aero and Appearance: Hoods, Front/Rear Fenders, Side Skirts (Heavier)
- Aero and Appearance: Rear Spoiler
- Aero and Appearance: Front Spoiler (Front spoiler decreases PI on lower class builds)
- Engine: Flywheel (Occasionally this decreases PI, not sure why)
Conversions
Engine Swaps
I check every engine swap before I commit to anything. I want to know whether the engine can fit the target class while leaving enough room for additional upgrades. Check which engines can use a centrifugal supercharger and prioritize those options, while comparing power to weight ratio.
Open the sortable Engine Swap Guide →
Aspiration Conversion
Drivetrain Conversion
For maximum performance, AWD is my default unless I deliberately want to avoid it. It improves launch and makes power easier to use. The differential gives me enough control to make an AWD car rotate instead of accepting the usual power-on understeer.
Widebody Kits
Using widebody kits is a judgement call. The reason to use it is wider rear tires, which helps with grip and handling.
The downside is added weight, increased PI, and lower top speed. I compare the complete build with and without it. The body kit only wins if the extra tire is worth the cost.
Aero and Appearance
Front Spoiler
Front aero is especially important because front grip is what improves turn-in.
Maximum front downforce costs less top speed than rear downforce, and the turn-in benefit is usually worth it – even on lower class builds.
As a bonus, it will usually decrease the PI for vehicles in lower classes.
Rear Spoiler
The adjustable rear spoiler will usually decrease PI.
For lower class builds (B class and below), I can set rear downforce to the minimum in the tuning menu and reduce the top-speed penalty.
At higher classes, I start with 0 and move it up as needed to maintain grip.
Tires and Rims
The only compounds I currently use:
| Compound | Where I use it | How I decide |
|---|---|---|
| Stock | Might work well up to B class (road or dirt) even when the tire itself is not great. Some cars are already equipped with great stock tires (slicks, offroad, etc.) for higher class usage. | Try it. If turn-in and overall grip are holding the car back, look at other options. |
| Rally | Road racing tunes. | Strong real lateral Gs for low PI. Ignore the misleading grip change over the tire graphic. They currently make everything except Stock or Slick irrelevant due to how much grip they offer for the PI. |
| Slick | My normal choice for S2 and X. | Some cars come with stock slicks that have more lateral grip than the regular slick tires. Compare Lateral Gs for both sets and choose the grip the build needs. |
| Offroad | Rally, dirt, and cross-country. | My default off-road compound. If the vehicle already came with stock offroad tires, test with both and see which one is best. |
Rear Tire Width
On AWD builds, I use the widest rear tires available. They can lower PI while improving lateral grip, braking, and acceleration. I would pay PI for that result if I had to.
For RWD builds, you will pay extra for this, but it might be worth it depending on the rest of your build.
Front Tire Width
More front tire width can increase front-end grip, improve turn-in, and reduce understeer. It also helps with launch on FWD builds. The PI cost is high, so it is one of the last things I consider and I only use it when the car needs it.
Drivetrain
| Part | What I use | Why |
|---|---|---|
| Transmission | 7-speed about 90% of the time. | Stock and Sport transmissions change gears slowly and don’t let you customize gear ratios. Higher gear counts add weight and can lower PI, but more shifting can slow you down. I usually use 8-10 speed transmissions only when the build needs the PI reduction. |
| Differential | Race for road racing Offroad/Rally for dirt and cross-country. | For an untouched road setup, the Drift differential defaults are closer to ideal than the Race differential defaults. |
Platform and Handling
| Part | My choice | Reason |
|---|---|---|
| Weight reduction | One of the highest priorities, period. | It improves power-to-weight, lateral Gs, and braking distance at the same time. The only reason not to do it is if top speed matters for your build, and you want to spend the PI on engine upgrades instead. |
| Front and rear ARBs | Always install both. | They usually cost about one PI and unlock one of the most useful adjustments. |
| Suspension | Race for road Rally for dirt/cross-country Drift for drift | I never leave it stock unless the car is already adjustable. I need access to the settings to maximize grip in the corners. |
| Brakes | Race for S1 and above Sport for most A and B Consider stock in C and D. | Brakes are worth it up to the point where the PI cost is better spent on weight reduction, tires, or power. Prioritize brakes a little more for touge builds. |
| Chassis stiffening | Usually stock. I consider it on very old cars. | It adds weight and normally is not worth the PI cost unless the original chassis genuinely needs it for higher power builds. |
Engine
After the rest of the build is taking shape, I use the Engine menu to fill the remaining PI. For handling builds, every choice is based on the finished horsepower-to-weight result.
| Priority | Parts | How I judge them |
|---|---|---|
| 1 | Exhaust | My first engine upgrade for handling builds because it adds power and reduces weight. |
| 2 | Supercharger / Turbo Upgrades | Adds a large amount of power, and in the case of the centrifugal supercharger, it’s usually a GREAT value in terms of PI. |
| 3 | Camshaft | I only use this if I’m targeting a top speed build or if I have a lot of PI to spend. |
| 4 | Other Upgrades (Air Intake, Fuel System, Ignition, Valves, Engine Blocks, etc.) | For handling builds, I use whichever option gives the best power to weight ratio. For top speed builds, focus on adding as much power as possible, even if weight increases. |
Finishing Touches
Once the important parts are chosen, I use these options to move the build a few PI without changing the entire setup. The goal is not just to hit the class cap. It is to spend or remove PI while protecting horsepower-to-weight, lateral Gs, and braking distance.
SPENDING REMAINING PI
| Adjustment | What It Actually Changes | My Priority |
|---|---|---|
| Front Tire Width | Adds front-end grip, improves turn-in, and helps FWD launch. The PI cost is usually high. | Best when the car actually needs front grip. |
| Driveline Upgrade | Removes a small amount of weight. | One of my preferred small PI upgrades. |
| Lighter Wheels | Reduces weight and rotating mass. | Good final upgrade if the PI cost fits. |
| Lighter Hood, Fenders, Bumpers, or Side Skirts | Removes a small amount of weight. The exact result depends on the car. | Check each part individually. |
| Flywheel | Removes a small amount of weight and improves engine response. | Useful after the important upgrades are finished. |
| Oil Cooling | Adds power, but can also add weight. | Only use it when the finished power-to-weight ratio improves. |
| Clutch | Can improve shift speed with a Stock or Sport Transmission. It normally does very little with a Race Transmission. | Low priority. Driveline is usually better. |
| Larger Front Wheels | Raises PI without providing enough useful performance. | Avoid. |
LOWERING PI
| Adjustment | What It Actually Changes | My Priority |
|---|---|---|
| Front Spoiler | On many lower-class cars it lowers PI while adding front downforce and improving turn-in. | One of the best possible PI reductions when available. |
| Rear Spoiler | Usually lowers PI and adds adjustable rear downforce and drag. Rear downforce can be set low to reduce the top-speed penalty. | Very useful, especially in lower classes. |
| Larger Rear Wheels | Lowers PI, but reduces tire sidewall and can make the car worse over bumps. | One of the first small PI reductions I test. |
| Heavier Wheels | Adds weight and lowers PI. | Simple and predictable. Add only as much weight as necessary. |
| Heavier Hood, Fenders, Bumpers, or Side Skirts | Adds weight and may slightly change weight distribution. | Useful when only a small PI reduction is needed. |
| Flywheel | Occasionally lowers PI instead of raising it. The result changes by vehicle. | Check it, but do not expect the same result on every car. |
After every change, I use Toggle Stats and recheck the three numbers. Reaching the class cap is not an improvement if the cleanup part makes the finished car worse.
Tuning the Finished Build
I do not change every number immediately. I use a few strong starting values, leave the uncertain settings close to default, run the car, and then change the setting connected to the problem I can feel.
Tire pressure
Leave it alone if you do not know what you are fixing.
Higher PSI can sharpen response and can increase grip until it goes too far. Too high loses grip.
Lower pressure adds flex and can become vague.
Camber and toe
Start near default. Use camber only when the tire needs more cornering support. I normally leave toe at zero because it adds drag and can make the car unstable.
Caster
Start at 7.0 unless it causes a problem. More caster helps turn-in and gives the front tire useful camber while steering.
Anti-roll bars
Start at 1 front and 65 rear for a road tune. This can cause oversteer on some cars, so test it rather than treating it as permanent.
Springs
Start with the suspension defaults and adjust from feel. Softer front generally gives the front more grip. Softer rear generally gives the rear more grip and can calm instability.
Ride height
Start with front and rear ride height maxed. Lower the car only when body roll is creating instability in corners. Softening the rear suspension relative to the front can also help calm that instability.
Damping
Start near default. If the car skitters over bumps, soften it. If it keeps floating or oscillating after the bump, add damping gradually.
Aero
Use strong front downforce. Set rear downforce only as high as needed for stability. Finish aero before gearing because downforce changes the speed the car can actually reach.
Braking
Leave it at default first. Adjust only after testing shows a braking problem.
AWD Differential Starting Point
| Setting | Starting point | What I change |
|---|---|---|
| Front acceleration | As high as possible without causing understeer. | Reduce it to reduce power-on understeer. |
| Front deceleration | 0%. | Raise only when entry stability requires it. |
| Rear acceleration | 100%. | Reduce if the car understeers or will not rotate under power. This should be less common. |
| Rear deceleration | 0%. | Raise only when lift-off or braking makes the rear unstable. |
| Center balance | Road: 65–86% rear. Offroad: 50–60% rear. | More rear bias improves turn-in but reduces stability under acceleration. |
Gearing Comes Last
Aero and differential settings come first. Downforce limits the speed the car can actually reach. Differential balance changes how well the car accelerates. If I tune the gearbox before those settings, I may have to do it again.
Start with final drive
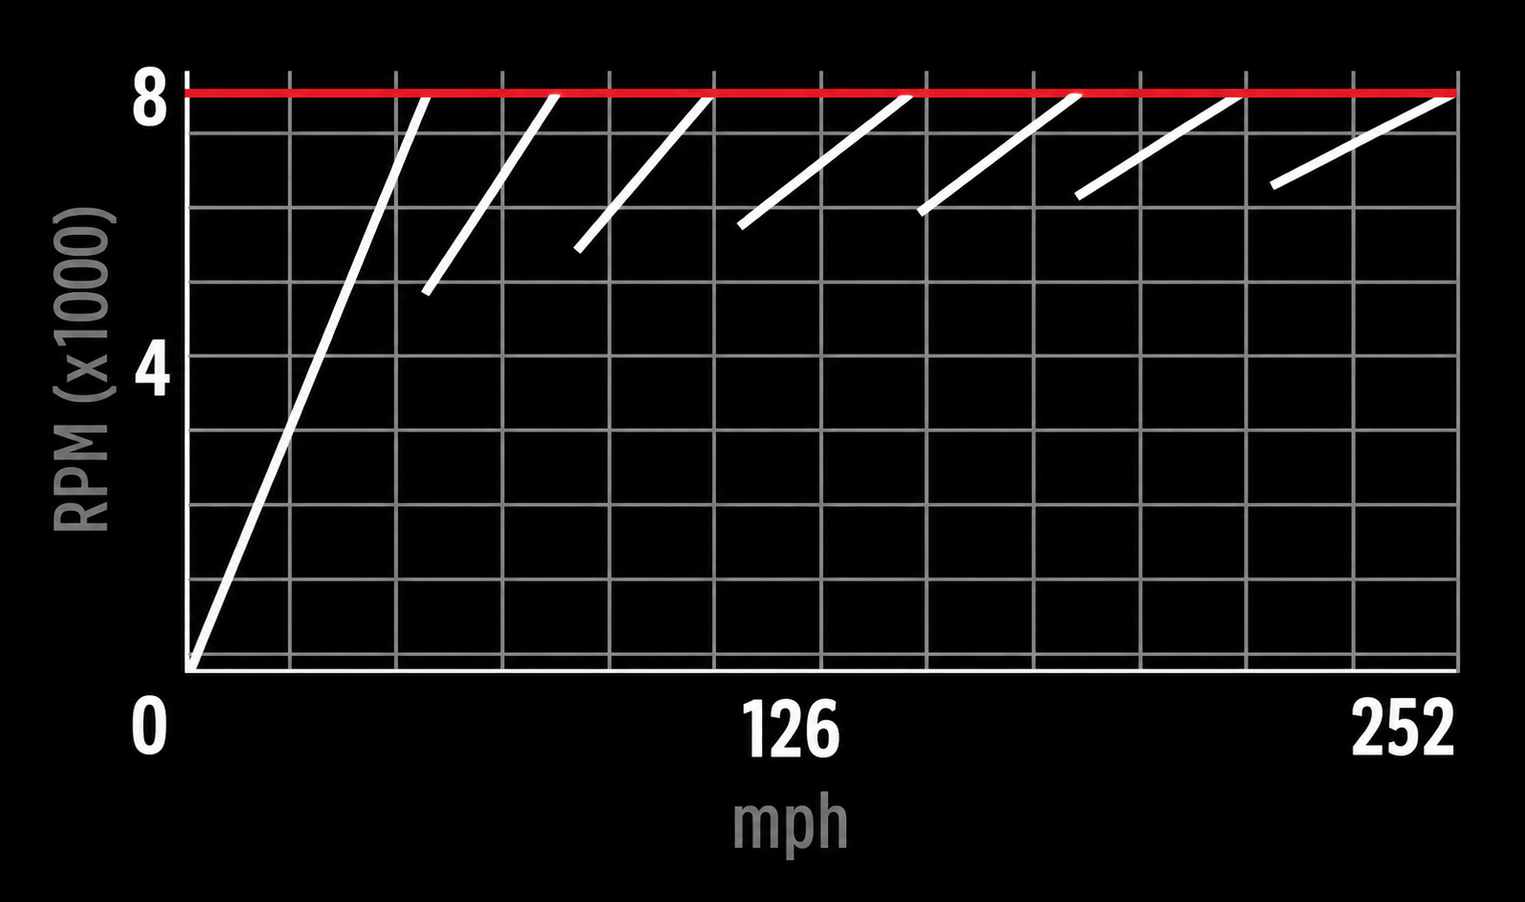
The gearing chart shows a maximum mph at the far right. That does not mean the top gear should always reach the far right edge. Once downforce is added, the car may not be capable of that speed.
Experiment with lowering final drive up to 20% to see if top speed increases. This checks to see if the top speed is being met in the second-highest gear. If the top gear isn’t where your top speed is met, then it goes unused. The first six gears have effectively been made longer for no benefit, which costs acceleration.
Individual gears
- First gear must launch without wasting the power in wheelspin.
- Each gear should be shorter than the last.
- The gaps should be larger in the early gears and get smaller toward the top gears.
- Watch where RPM lands after each shift. The engine should stay in its useful power range.
- A 7-speed is enough almost all of the time. Do not add shifts unless the PI reduction is worth it.
How I Test the Tune
A person cannot be completely objective, but I can be consistent on a small area. I use Narai-Juku Circuit because it gives me a sweeping corner, multiple chicanes, bumps that test the suspension, and most importantly, a hairpin.
The hairpin is the most rigorous test for a tune in my opinion because one corner exposes several potential problems with a tune. It will expose problems with braking, turn-in understeer, corner-exit oversteer, and acceleration as the car leaves. If the car can handle hairpin turns without any of those issues, it’s probably a good tune.
My comparison process
- Run the same course until the clean times are reasonably close. Within one tenth of a second is excellent, but the point is simply to stop comparing a perfect lap with a bad one.
- Average several clean attempts before changing anything.
- Save the tune before the change so it can be rolled back.
- Change one setting or one connected area at a time.
- Run the same test again and keep the change only if the average or the specific problem improves.
Speed-zone alternative
Find a speed zone with a good mix of corners. Pick a fixed starting point next to a street lamp, pavement mark, or another landmark. Start from a dead stop, run the zone, record the average speed, and repeat until the results are consistent. Then change the tune and compare the new average.
Fix the Problem You Can Feel
I describe the problem by the part of the corner where it happens. “The car is bad” does not tell me anything. “The front loses grip when I turn in” or “the rear steps out when I add throttle” tells me where to look.
Entry Understeer
The car refuses to turn in when you brake into the corner. Front tires feel dead.
- Front Anti-Roll Barsoften
- Front spring ratesoften
- Front rebound dampingsoften
- Brake biasshift rearward
- Rear diff decelreduce
- Casterincrease
Mid-Corner Understeer
Steady-state pushing — you’re cornering at constant throttle and the front just won’t bite.
- Front Anti-Roll Barsoften
- Front tire pressurelower
- Front camberadd negative
- Front downforceincrease
- Front ride heightlower
Exit Understeer (On Throttle)
Front washes out when you apply power on corner exit — common on AWD and FWD.
- Front diff accelreduce
- Rear spring ratestiffen
- Rear downforcereduce
- Rear bump dampingstiffen
- Rear toe-inreduce
High-Speed Understeer
Plows through fast sweepers but slow corners feel okay. Front lacks aero grip at speed.
- Front downforceincrease
- Front camberadd negative
- Front ride heightlower
- Rear downforcereduce
Entry Oversteer (Lift / Trail-Brake)
Rear steps out when you brake or lift off entering a corner.
- Rear diff decelincrease
- Rear Anti-Roll Barsoften
- Brake biasshift forward
- Rear spring ratesoften
- Front reboundstiffen
Mid-Corner Oversteer
Rear keeps sliding through a steady corner at constant throttle.
- Rear Anti-Roll Barsoften
- Rear camberadd negative
- Rear downforceincrease
- Rear ride heightlower
Power Oversteer (Snap on Throttle)
Rear breaks free when you get on the gas. Common on high-power RWD.
- Rear diff accelreduce
- Rear spring ratesoften
- Rear bump dampingsoften
- Rear downforceincrease
- Rear toe-inincrease
Snap Oversteer (Violent, Sudden)
Rear comes around without warning. Almost always a too-stiff rear.
- Rear Anti-Roll Barsoften
- Rear spring ratesoften
- Rear reboundsoften
- Rear bumpsoften
- Rear diff accelreduce
◆ Other Problems
Nose Dives Under Braking
Front compresses dramatically when you brake, upsetting the chassis before turn-in.
- Front bump dampingstiffen
- Front spring ratestiffen
- Front reboundstiffen
Bouncy / Floaty
Car oscillates over bumps — suspension can’t settle. Dampers too soft.
- Bump (both axles)stiffen
- Rebound (both axles)stiffen
- Springsstiffen
Skitters Over Bumps / Curbs
Loses grip suddenly on rough surfaces — suspension too stiff, tires leave the ground.
- Bump dampingsoften
- Springssoften
- Anti-Roll Bars (both)soften
- Ride heightraise
Bottoms Out / Scrapes
Suspension hits its travel limit. Causes sudden grip loss when it does.
- Ride heightraise
- Springsstiffen
- Bumpstiffen
Wheel Spin on Exit
Rear tires spin instead of putting power down. High-power RWD classic.
- Rear diff accelreduce
- Rear spring ratesoften
- Rear bumpsoften
- Rear downforceincrease
Lazy in Chicanes
Car feels sluggish changing direction quickly — too soft to transition.
- Anti-Roll Bars (both)stiffen
- Rebound (both)stiffen
- Springsstiffen
Tuning Cards by forza.guide - Used with permission.
The build creates the potential. The tuning makes it usable. The test tells me whether I actually improved it.